Monday, December 31, 2018

Kinders Celebrate Fall in the Art Room.

It's December 31st!

 No better time than today to recap what my Kindergarten Artists have been up to this past fall.  
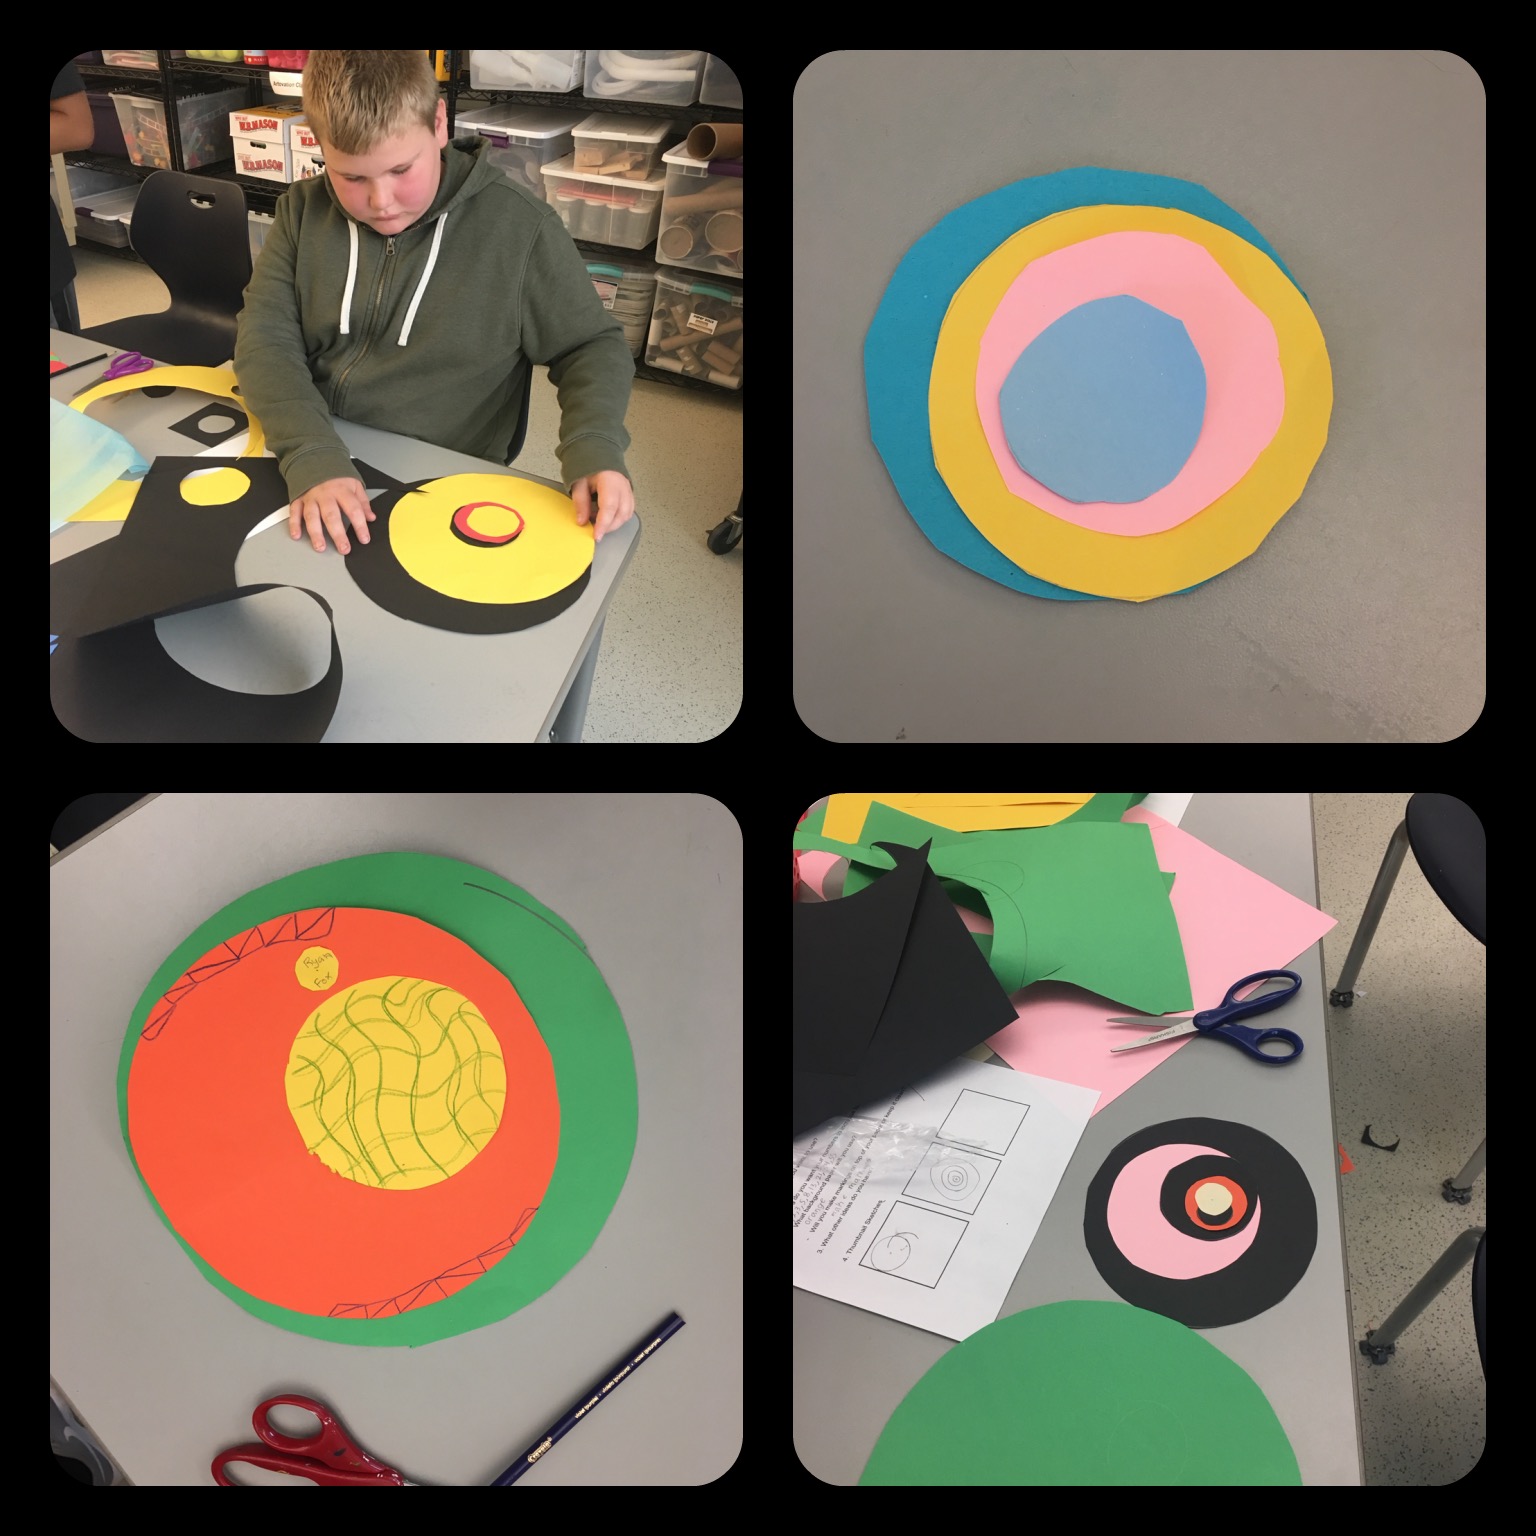
They have been tackling one task after another to build fine motor skills and creative thinking.

I love to start out the year exploring line. 

We started out with one of my favorite line videos from Scratch Garden 
and then brainstormed all sorts of lines.

These lines became an integral piece to our first fall project: Smoosh Pumpkins

Kinders learned they can create a mirror image print by placing paper on top of another 
and pressing them together. 

They loved watching their paint transfer from one paper to the next as then rubbed them together.

Check out this busy Kinder Artist at work!


After making our prints, we used line designs to create pattern and design in the fall pumpkins prints.  The best part is that they made 2 pumpkins so they were able
leave their best at school and take one home! 

Following the pumpkins we moved into fall tissue paper collage leaves.
Students spent 1 class preparing their fall collages. 
We explored colors of fall by reading the "fall" section of Red Sings from Treetops.


If you don't know this book, it is worth checking out!
It's filled with descriptive color poems for each season.  I use it with multiple grade levels!


This tissue paper collage is a favorite because every student's work looks great no matter their skill.  
The bright colors are eye catching and of course we continued to explore line!


Our falls leavers were a great tie into fall tree sculptures.  
We did this in 2 ways: Tinker Lab exploration and paper bag sculptures.

I used the idea of fall trees as a way to introduce Kinders to the Tinker Lab.  
After going over the rules of the lab they were presented with a challenge:  
create a fall tree that could hold a small bird figurine.


I loved seeing how these guys tackled this challenge and persevered through the different materials!

Finally, we used their success with the Tinker Lab Challenge as inspiration for their Paper Bag Sculptures.  This lesson has been around for a long time and for good reason. It is perfect for little hands to practice important fine motor skills; cutting, twisting, and pinching.  

I love starting this lesson out on the floor as group!


After we get all our tree bases sculpted, Kinders head back to their tables to finish their 3D works.


It was a VERY busy Fall!

What are your favorite fall art lessons?!


Thursday, November 15, 2018

The Art of Letterboxing


This month, The Art Ed Bloggers Network is writing about "artful excursions". 
What better than for me to share my love for Letterboxing!

Usually, that statement is followed by a blank stare from anyone who doesn't know about letterboxing.  So if you happen to be blank staring at your screen right now, read on.  
I am about to share my secret nerdy art hobby with you!

What is Letterboxing?


I like to think of it as an art scavenger hunt.  Letterboxing dates back to the 1850s in England when hikers left postcards along a special route for future hikers to find them. Today, letter boxes are hidden in weatherproof containers with sets of clues that lead searchers to them.

Are you intrigued yet?

So, where does the art come in? 

Each letter box contains a hand carved stamp.  Letterbox seekers travel with their own hand carved stamp.  When the box is located stamps are exchanged in special log books as a way to track where you've been and who has visited each box.

Related image

For me it is all about finding the stamps.  Each stamp represents something unique about it's owner, it's location, and has it's own story.  Some stamps are beautifully detailed whereas some are very simple.  Each time I locate a box its a special mystery as I discover what hides inside.

How do you find each box?

In the US, there are two sites where clues are located.  Letterboxing North America and Atlas Quest.
You can search for clues by city/town or zipcode.  Clues can range from easy to difficult.  Clues can be found by car, bike, or on foot.  Letterboxing is for any ability and skill!

I use letterboxing as a way to explore new places and discover areas that I would never have visited otherwise.  I found boxes hiking in the woods, off of bike paths, in cities, even in other countries.  
I even found one letterbox that you could only get to by boat! That one was one my favorites!


How do you get started?

Put together your own letter boxing kit.  You'll need a log book, a pen, a stamp pad, and a stamp.


Design your own stamp! Carving a stamp is like creating a mini linocut or woodcut.  Speedball  tools  are easy to use with a speedy carve piece of linoleum.  

Image result for linocut tools  Related image
Design a stamp that represents you! 
My family has changed as my family has grown. I think I may be ready for a new one!

My first stamp
Second Family Stamp 

Sometimes, special bonus prizes and "hitch hiker" stamps are hidden inside letterboxes. 


What are you waiting for?  Get Letterboxing today!

Tuesday, October 9, 2018

Art Supplies: The Case for Sharpies and a Few Freebies


After a short hiatus, the Art Ed Bloggers Network is back in action! The AEBN is a partnership of art teachers from across the country.  On the second Tuesday of each month all of these amazing teachers blog and post on the same topic.

This month we are discussing art supplies!!

There is so much to talk about when it comes to art supplies.  I'm assuming that maybe you are reading this post because you don't have as much experience with art supplies or maybe you do and are just looking to switch things up a bit?!


There are many places to order supplies from and if you aren't limited to purchasing through purchase orders it opens up so many more doors for you.  When I order for school, I can only order from companies that accept purchase orders (so no Amazon!).  The nice part about Sax/School Specialty is that they give schools 30% off. You can get a lot for your money!

Something FREE!
My favorite thing to include in my order are the paper sample books. First, they are free!  They let you see the papers first hand. You could also save them and use them for scraps and collage.

These are 2 products that I love having the actual paper in front of me to make sure I'm ordering the right color.  Here's a link to their swatch books:

TRU-RAY Construction Paper Swatch Book
Spectra ArtKraft Duo-Finish Paper Swatchbook
The Case for Sharpies!

When I started thinking about this post, I tried to think about one supply that every art room should have. That's a tall order as there are so many art supplies out there! 

If I had to make a case for one supply though, it would be the Sharpie!

Sharpies are so versatile.  
They can be used as the main ingredient or they can add to and enhance a work of art.  

Here are a few lesson examples that emphasized sharpie.
"What do you Do with a Dot": I first saw this lesson on the Firstie Land Blog
I tried it with my first graders this year for Dot Day and it was a huge success!


Sharpies are also incredible with line design and Zentangle lessons.

A few years ago I tried out this Zentangle Landscape Lesson with 6th grade.


I haven't thought about this lesson in a long time.  The students were able to explore many different styles of lines and patterns which were only enhanced by the use of sharpie.
I'm definitely going to have to give this one a whirl again this year!

Introduce your sharpie lessons by exploring these artists and their incredible Sharpie art.


David LaFerriere's Sandwich Bag Art
sandwich bag art with a marker david laferriere (1)

Malaysian Cup Artist, Cheeming Boey

I love that these Sharpie examples show you that art can take place on any platform!

What are you're favorite Sharpie lessons?


Sunday, September 16, 2018

Ringing in the New School Year with International Dot Day!

I wanted to officially welcome everyone back to the new school year!  

Since Dot Day always falls in the beginning of the school year it is a great way to start things off. Dot Day is a global celebration of Peter Reynolds, The Dot. Learn more about Dot Day here!
Celebrating Dot Day as a community sets the stage for the importance of
creativity and courage early on in the school year.  

Both Fuller Meadow and Howe Manning artists jumped right in on day one with Dot Day projects.  More posts to come about what they've been working on, but here are a few highlights
of some of their finished and in progress work.

Kindergarten
1st Grade

2nd Grade

5th Grade

6th Grade

Of course no Dot Day celebration is complete with out dots, and tons of them! 


I am a huge fan of all those kids that go out of their way to make home made dot outfits!  
This year I joined them, but theirs are definitely better!


These two kinders totally got into the spirit!


It was so wonderful to see our whole Middleton community coming together 
to create and celebrate International Dot Day.  


Classes incorporated art, math, ELA, and STEAM. 
 Brave kindergarten teachers broke out watercolors with their students in their second week of school.  There is not better day to try something scary and new then on Dot Day!


Dot Day 2018 is a strong indication that is going to be an Art-rageous school year.

WELCOME BACK!!

Tuesday, July 10, 2018

Use an Art Room Mantra to Start the School Year With a Bang!


I know, it's only July.... but, I am already thinking about the upcoming school year.
Actually, I have been thinking of new things I'd like to do since school ended! 

I've already picked up a stash of goodies at Target, because who can resist their dollar bins!


As the new school year approaches, the first thing I like to do is make sure I'm all set for the first week.  I always make a plan, not only of what projects we will do to get our feet wet, 
but also what information to give out and go over. 

A few years ago I heard an art teacher talk about using a mantra as a tool to guide not only the school year and student behavior and expectations, but also to serve as inspiration for artistic choice and decisions.  I loved this idea and I have been using one each year ever since. 

My first mantra was inspired and created by the original art teacher - 
"Do Your Job".  
I loved how it could be used to check in with students.  
Are you doing your job?  How are you doing your job today?  
Since then I've tried to get a little "punny" with my mantras. 

Take a look at one of of my past punny mantras:

Click Here for 2017-2018 Art Room Mantra


 I will be using this year's mantra to inspire and guide students at both
Howe Manning and Fuller Meadow.

Be ARTrageous!

In fact my collegue, Kelli Smullin, has already begun to prepare students by creating this fabulous board at the end of this past school year.


I hope that this mantra will inspire students to take risks in art this year.
Try something new, work bigger, go abstract, work with someone you don't typically work with.
These simple words may just challenge young artists to take a chance and be ARTrageous!

Do you use a mantra in your class?
I'd love to hear about it!


 This post is a part of The Art Ed Blogger's Network: Monthly Tips and Inspiration from Art Teacher Blogs. On the second Tuesday each month, each of these art teacher blogs will post their best ideas on the same topic.

Participating Art Teacher Blogs:


Saturday, June 23, 2018

Take the Summer Art Challenge

This summer I'm joining a growing art teacher trend and offering a Summer Art Challenge.

It's so easy....


Step 1: Click here to Download the Summer Art Challenge Bingo Board, created by the Art of Ed.

Step 2: Start Creating! Pick any items on your bingo sheet and get busy. Remember to ask your parents first.  Or even better create with your family.

Step 3: Document.  Take pictures, Show your family, Email Ms. Nasser to report back! Then cross off the item on your sheet.

Step 4: Bring in your finished sheets and artwork at the end of the summer for a chance to win a prize and have your work on a special bulletin board!

Happy Creating!
I can't wait to see what you do this summer!

Adopt A Rescue Animal Today!


This spring, second graders embarked on a true PBL (project based learning) experience. 
I was inspired by this Mrs. Knights Smartest Artists' Pet Portraits.  Check out her lessons here!

When it was time to tackle our clay model magic lesson I knew my grade 2's would love it!

I started out by printing pictures of cats and dogs available for adoption from two local animal shelters, The Northeast Animal Shelter and the Cape Ann Animal Aid.  Click on their links to learn more about their animal adoption.Students created animal sketches based on these images.  

Following the sketching process, students began sculpting with Model Magic. Student's learned to push and pull and manipulate their clay to capture their animals best features!


The next step was to paint.  
Painting was divided into 2 layers over 2 days, the background and the details. 
 We also experimented with using a spot of white for the reflection in the eyes and noses.
I loved seeing their rescue animals come to life with color. 


They did such a great job - take a look!


Finally, to make this a true project based learning experience, students learned about the importance of adopting rescue animals from former Middleton student, Molly Wogan.   Molly is such an amazing young woman.  She started her own organization working and volunteering with many local Animal Shelters.  Click here to learn more about the wonderful work Molly does with PAWS New England.

We were so fortunate to have Molly come and talk to the 2nd Grade about her volunteer work. 
To prepare for Molly's visit we had a drive and collected donations for the Cape Ann Animal Aid; used linens, treats, newspapers, toys, and gift cards. 
We loved hearing how important it is to help animals and adopt a pet!


2nd grade artists used Molly's presentation as research for their persuasive arguments about "Why you should adopt a pet."  Finally, they used Chatterpix to make their special arguments!

They did such a wonderful job on their Chatterpix arguments.  

 Begin's Class 

Kennedy's Class

LeVangie's Class

Mulligan's Class

What did you think?  
Did they persuade you to adopt a new cat or dog?!

Thursday, June 14, 2018

Inside Relief Architecture with Grade 2

This year, grade 2 artists dove into architecture and designed their own buildings.
We explored all sorts of different residential structures, 
 like free standing houses, town houses, and city buildings. 
 We examined roof lines, window details, doors, porches, and types of siding.

Students started out using a ruler to draft their building designs.
They then used crayon and marker to add color to their drawings.
2nd graders also learned to increase crayon pressure to show value in their houses and make them appear more 3-dimensional.  Finally student's mounted their buildings on cardboard using varying layers of small cardboard squares behind each building to create a work of art in relief.

I loved seeing the whimsy come out in their finished houses!


Here's a few second grade artists showing off their work at our annual Flint Library Art Show!


The last surprise part of this project was tying in the green screen. 
Each 2nd grader wrote an artist's statement, where they analyzed and reflected on their work. 
 Thank you to our Technology Specialist, Dierdre Baker who, filmed each student reading their statement and used Do Ink Tweets to put each student inside of their work.


Check out each group's performances - I loved how they turned out!

Mrs. Begin's Class


Mrs. Kennedy's Class


Mrs. LeVangie's Class


Mrs. Mulligan's Class